Home
/ How To Make A Dog Harness Out Of Webbing - With all the materials handy, putting this dog harness together should be easy.
How To Make A Dog Harness Out Of Webbing - With all the materials handy, putting this dog harness together should be easy.
How To Make A Dog Harness Out Of Webbing - With all the materials handy, putting this dog harness together should be easy.. If you don't have access to a commercial harness, you can still fashion a functional harness from a length of rope or webbing. When you make a custom dog harness, the tie piece goes between the dog's legs to connect the front section of the harness with the rear part. The length should be approx. Fold this webbing around the neckband covering the back seam, ahead and behind. And here are the paracord harness instructions, don't be put off by the cat.
The length should be approx. If you don't have access to a commercial harness, you can still fashion a functional harness from a length of rope or webbing. Diy step in dog harness materials needed: Use the lighter to secure the ends by lightly melting the webbing so it will not fray. Form a loop around the collar for the bottom portion of the harness.
Dog Harness With Handle 4knines 4knines Com from cdn.shopify.com Diy step in dog harness materials needed: These fleece harnesses are comfortable, great for sensitive skin, fully customizable, versatile for working dogs, and fun to make! Make sure the sides of the harness don't pull up under the arms. Make your cut from the end 8 inches further than the spot you just marked. The asrc seat harness is a comfortable and straightforward standard for tying a makeshift harness. Cut the cotton webbing so it is slightly shorter than the strip of fabric. Place the webbing over the back of your dog's neck and loop towards the center of his chest (where the red arrow in the picture is pointing). Lay your webbing on a flat surface.
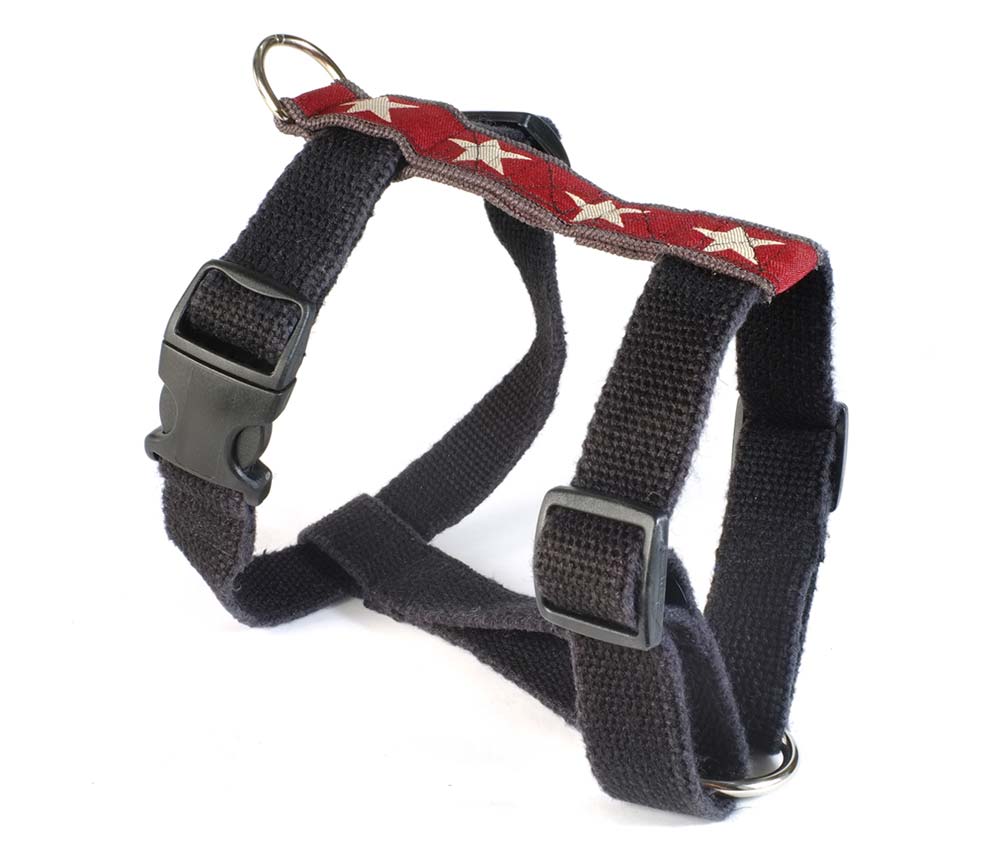
Place the webbing over the back of your dog's neck and loop towards the center of his chest (where the red arrow in the picture is pointing).
When you make a custom dog harness, the tie piece goes between the dog's legs to connect the front section of the harness with the rear part. Four times the neckband width. Determine the appropriate width for your dog's halter based on your dog's size. Refill sets also available for cat collar, martingale and leash. Sew where the webbing joins up again. Make sure the sides of the harness don't pull up under the arms. Then open it up, and fold each of the long, raw edges towards the center. Simply skip step one, perform step two, then skip all the way to step nine. Mark the spot on the nylon webbing where each side would cross. The hasty webbing harness enables a temporary lifting harness seat to be constructed from a piece of webbing strapping. Use your marker and mark out six places for adjustment holes. Pull gently as you wind this webbing down your dog's chest to reach the part of the harness that sits behind his front legs. The pin should now be between the rib loop and the neck loop.
Show your dog some love by making th. Hold the front end of the strap here. Browse our 'make' section to find the best coated webbing for your product or application. If you don't have access to a commercial harness, you can still fashion a functional harness from a length of rope or webbing. Insert your dog's leg through the first leg hole of the harness.
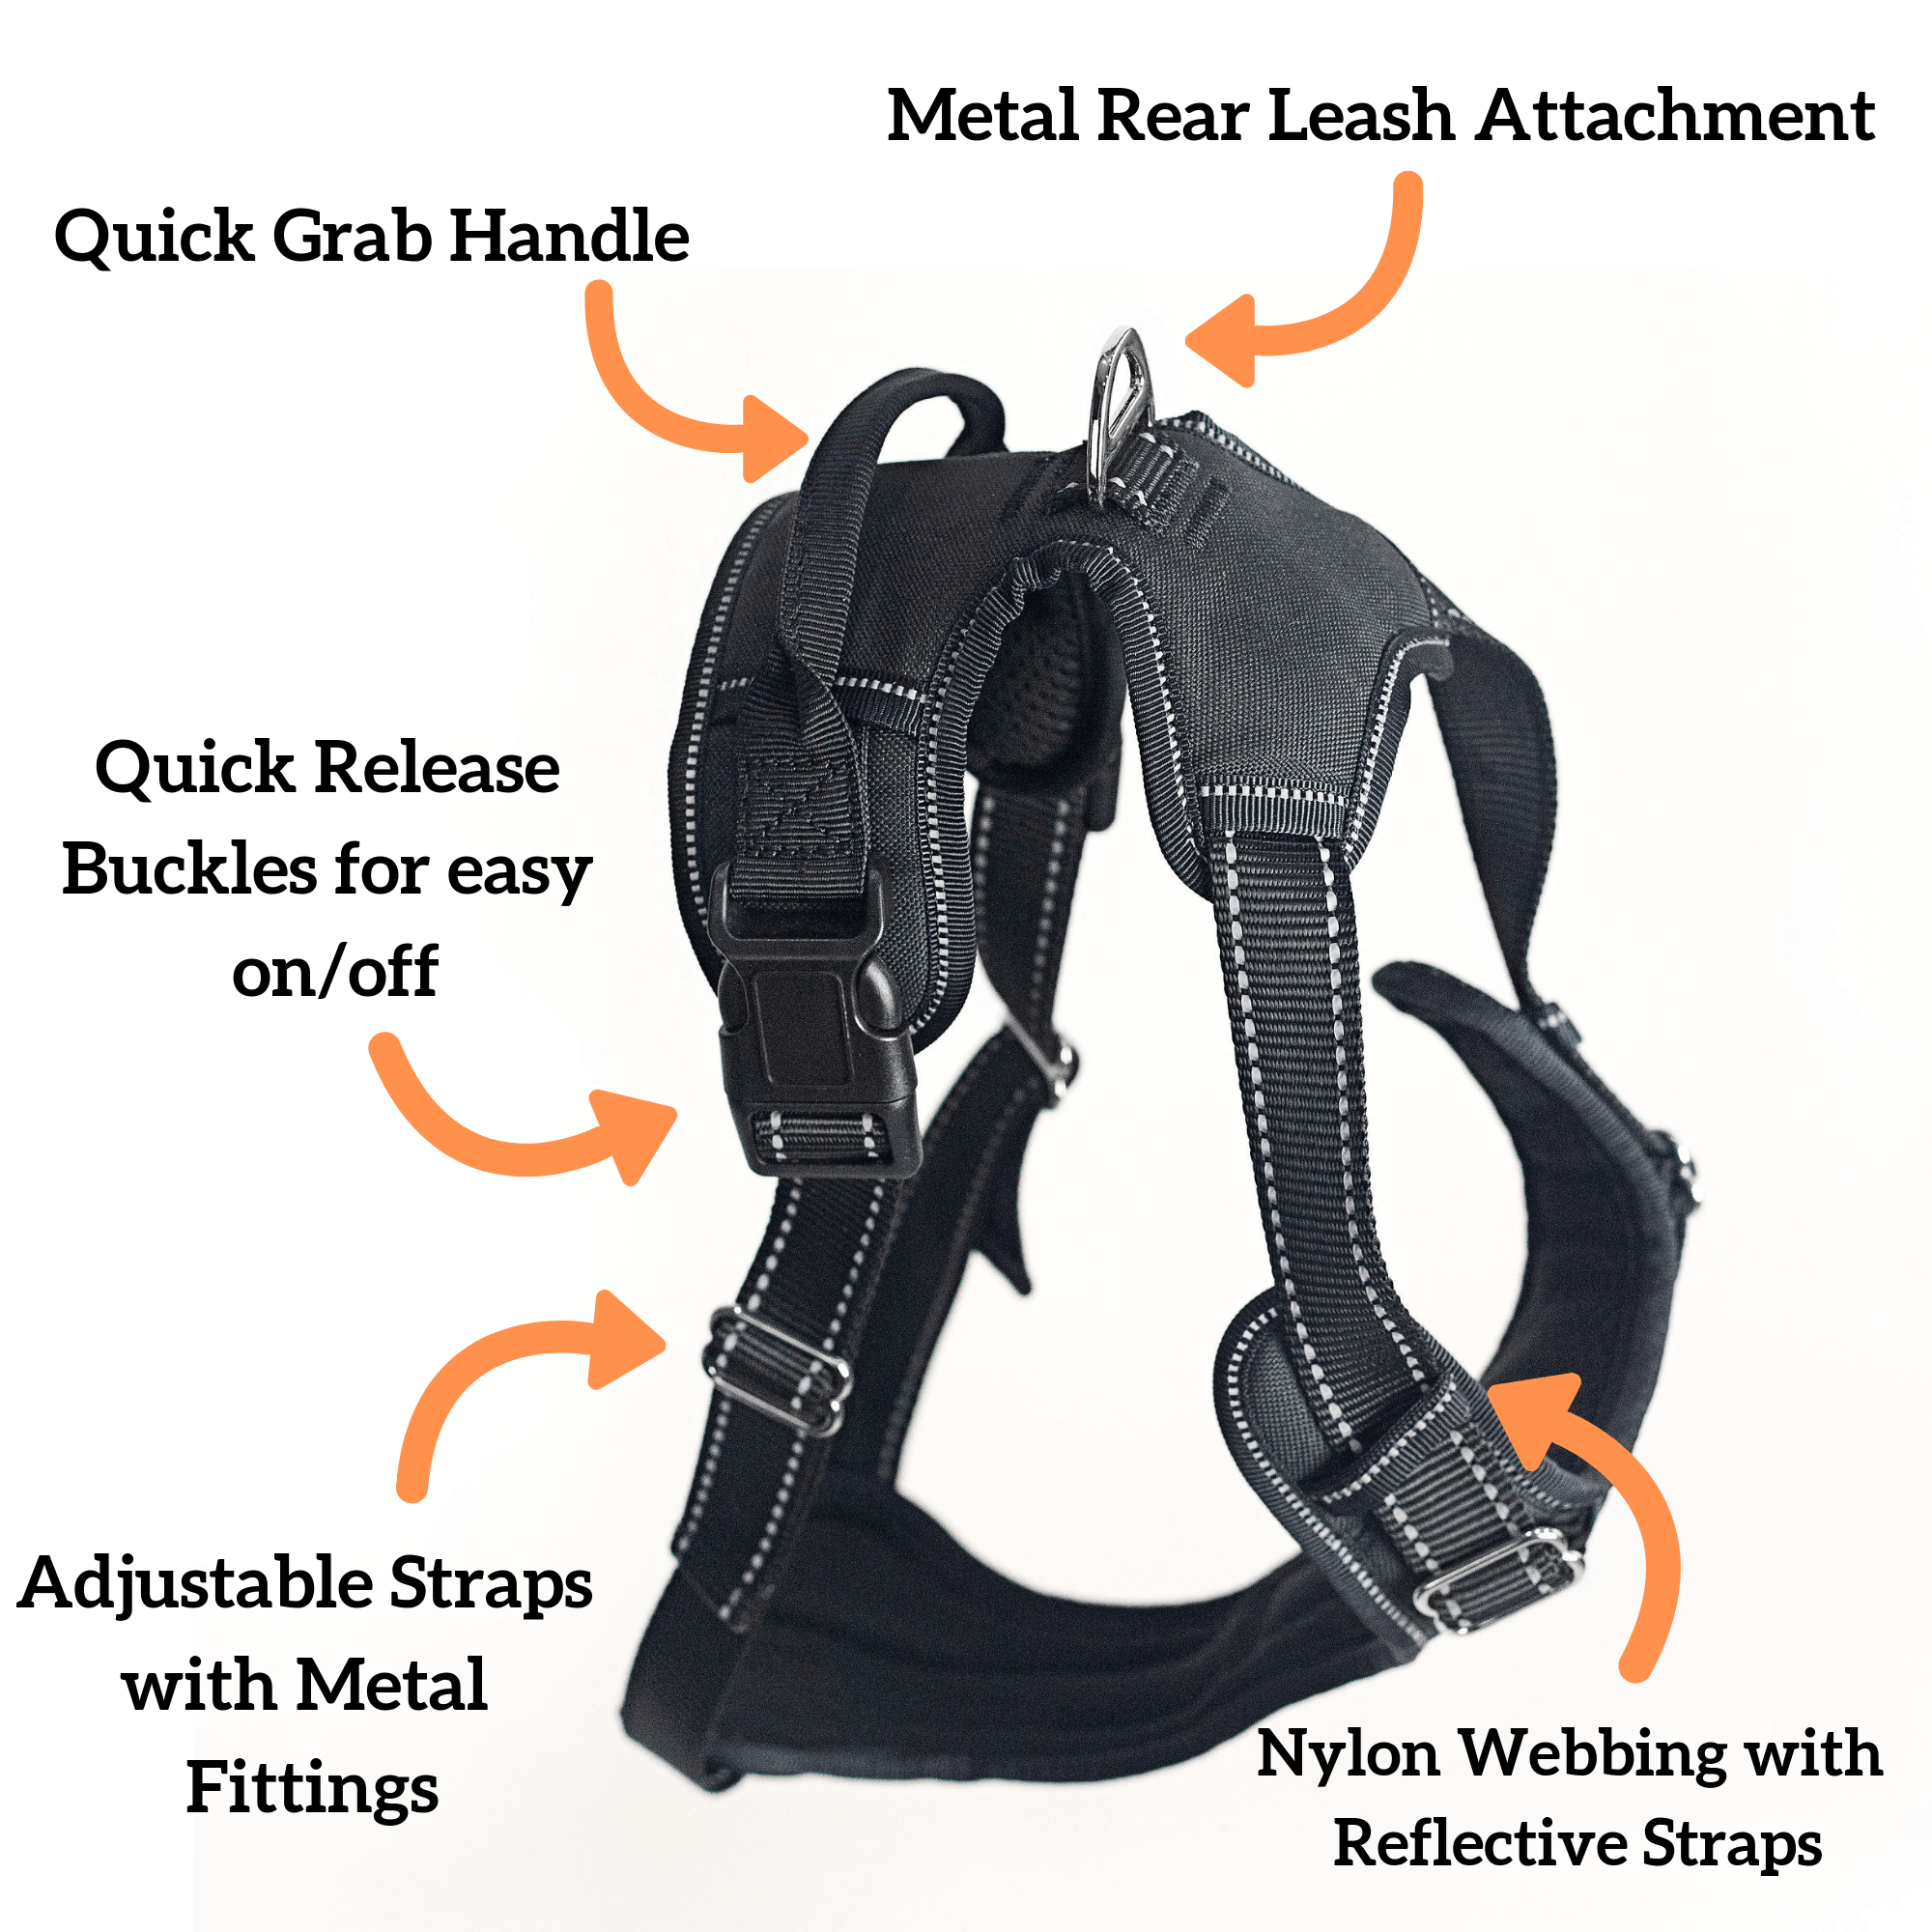
Hemp Dog Harness Decorative Hemp Harness Earthdog from www.earthdog.com 2 yards of nylon webbing 2 yards of coordinating ribbon (jacquard or grosgrain work best, and this is optional) hardware: Simply skip step one, perform step two, then skip all the way to step nine. I make them for my katie (an english pointer with a 17″ neck, 29″ chest, 19″ waist and 28″ from neck to tail) and for friends' dogs that i pet sit which are much smaller. It is very important to make sure the thread goes through both the webbing and the fabric. This first model uses a combination of webbing and soft fleece to create a soft reduced friction dog harness.this is great for dogs like my chihuahua that tend to lose hair slowly where more rigid harnesses rub against the skin. The harness also has two separate attachment points: If pulling is the reason the dog is walking on a harness, you. Use the lighter to secure the ends by lightly melting the webbing so it will not fray.
If pulling is the reason the dog is walking on a harness, you.
I love crochet crafts, here's one you can check out. For smaller collars, you'll want it closer to the edge, but not so close that you miss the webbing! With all the materials handy, putting this dog harness together should be easy. You need to customize the h… Collar refill sets many colors available. These fleece harnesses are comfortable, great for sensitive skin, fully customizable, versatile for working dogs, and fun to make! Thread a slider on one end, make a loop and put the loose end through the slider again. Insert your dog's leg through the first leg hole of the harness. The pin should now be between the rib loop and the neck loop. 2 yards of nylon webbing 2 yards of coordinating ribbon (jacquard or grosgrain work best, and this is optional) hardware: Lay your webbing on a flat surface. Each personalized dog harness is easy to make and can be adapted to fit any size dog. The hasty webbing harness enables a temporary lifting harness seat to be constructed from a piece of webbing strapping.
However, if you want to make a simpler nylon webbing collar without the fabric, we can still help. Pull gently as you wind this webbing down your dog's chest to reach the part of the harness that sits behind his front legs. Collar refill sets many colors available. It uses a clip to connect at the side of the rib cage. Insert your dog's leg through the first leg hole of the harness.
Dog Control Harness Easy Walk Dog Harness Chest Plate Harness from cdn11.bigcommerce.com With all the materials handy, putting this dog harness together should be easy. Hold the front end of the strap here. Or 'shop' to buy a finished product from online retailers. For smaller collars, you'll want it closer to the edge, but not so close that you miss the webbing! Make a personalized dog harness for each season of the year, including holidays! Browse our 'make' section to find the best coated webbing for your product or application. I love crochet crafts, here's one you can check out. Form a loop on that end as well.
Thread a slider on one end, make a loop and put the loose end through the slider again.
This leash slips easily over the head then down under the front legs. Mark the spot on the nylon webbing where each side would cross. Use the lighter to secure the ends by lightly melting the webbing so it will not fray. Insert your dog's leg through the first leg hole of the harness. Determine the appropriate width for your dog's halter based on your dog's size. First, if you plan to put any type of ribbon on your webbing, sew that on first. Show your dog some love by making th. Hold the front end of the strap here. This means that the final knot will be offset and located above one hip. It uses a clip to connect at the side of the rib cage. Using a hot nail will cauterize and seal the plastic to keep it from tearing or fraying during use. You can also find simple instructions for a nylon webbing harness. Sew where the webbing joins up again.
Paracord dog collars, leashes, and harnesses are becoming increasingly popular and here is how to make onethese instructions are for the collar, but the technique can be used for halters and leashes how to make a dog harness. And here are the paracord harness instructions, don't be put off by the cat.
